


📖 Project Introduction
Prompt Optimizer is a powerful AI prompt optimization tool that helps you write better AI prompts and improve the quality of AI outputs. It supports both web application and Chrome extension usage.
🎥 Feature Demonstration
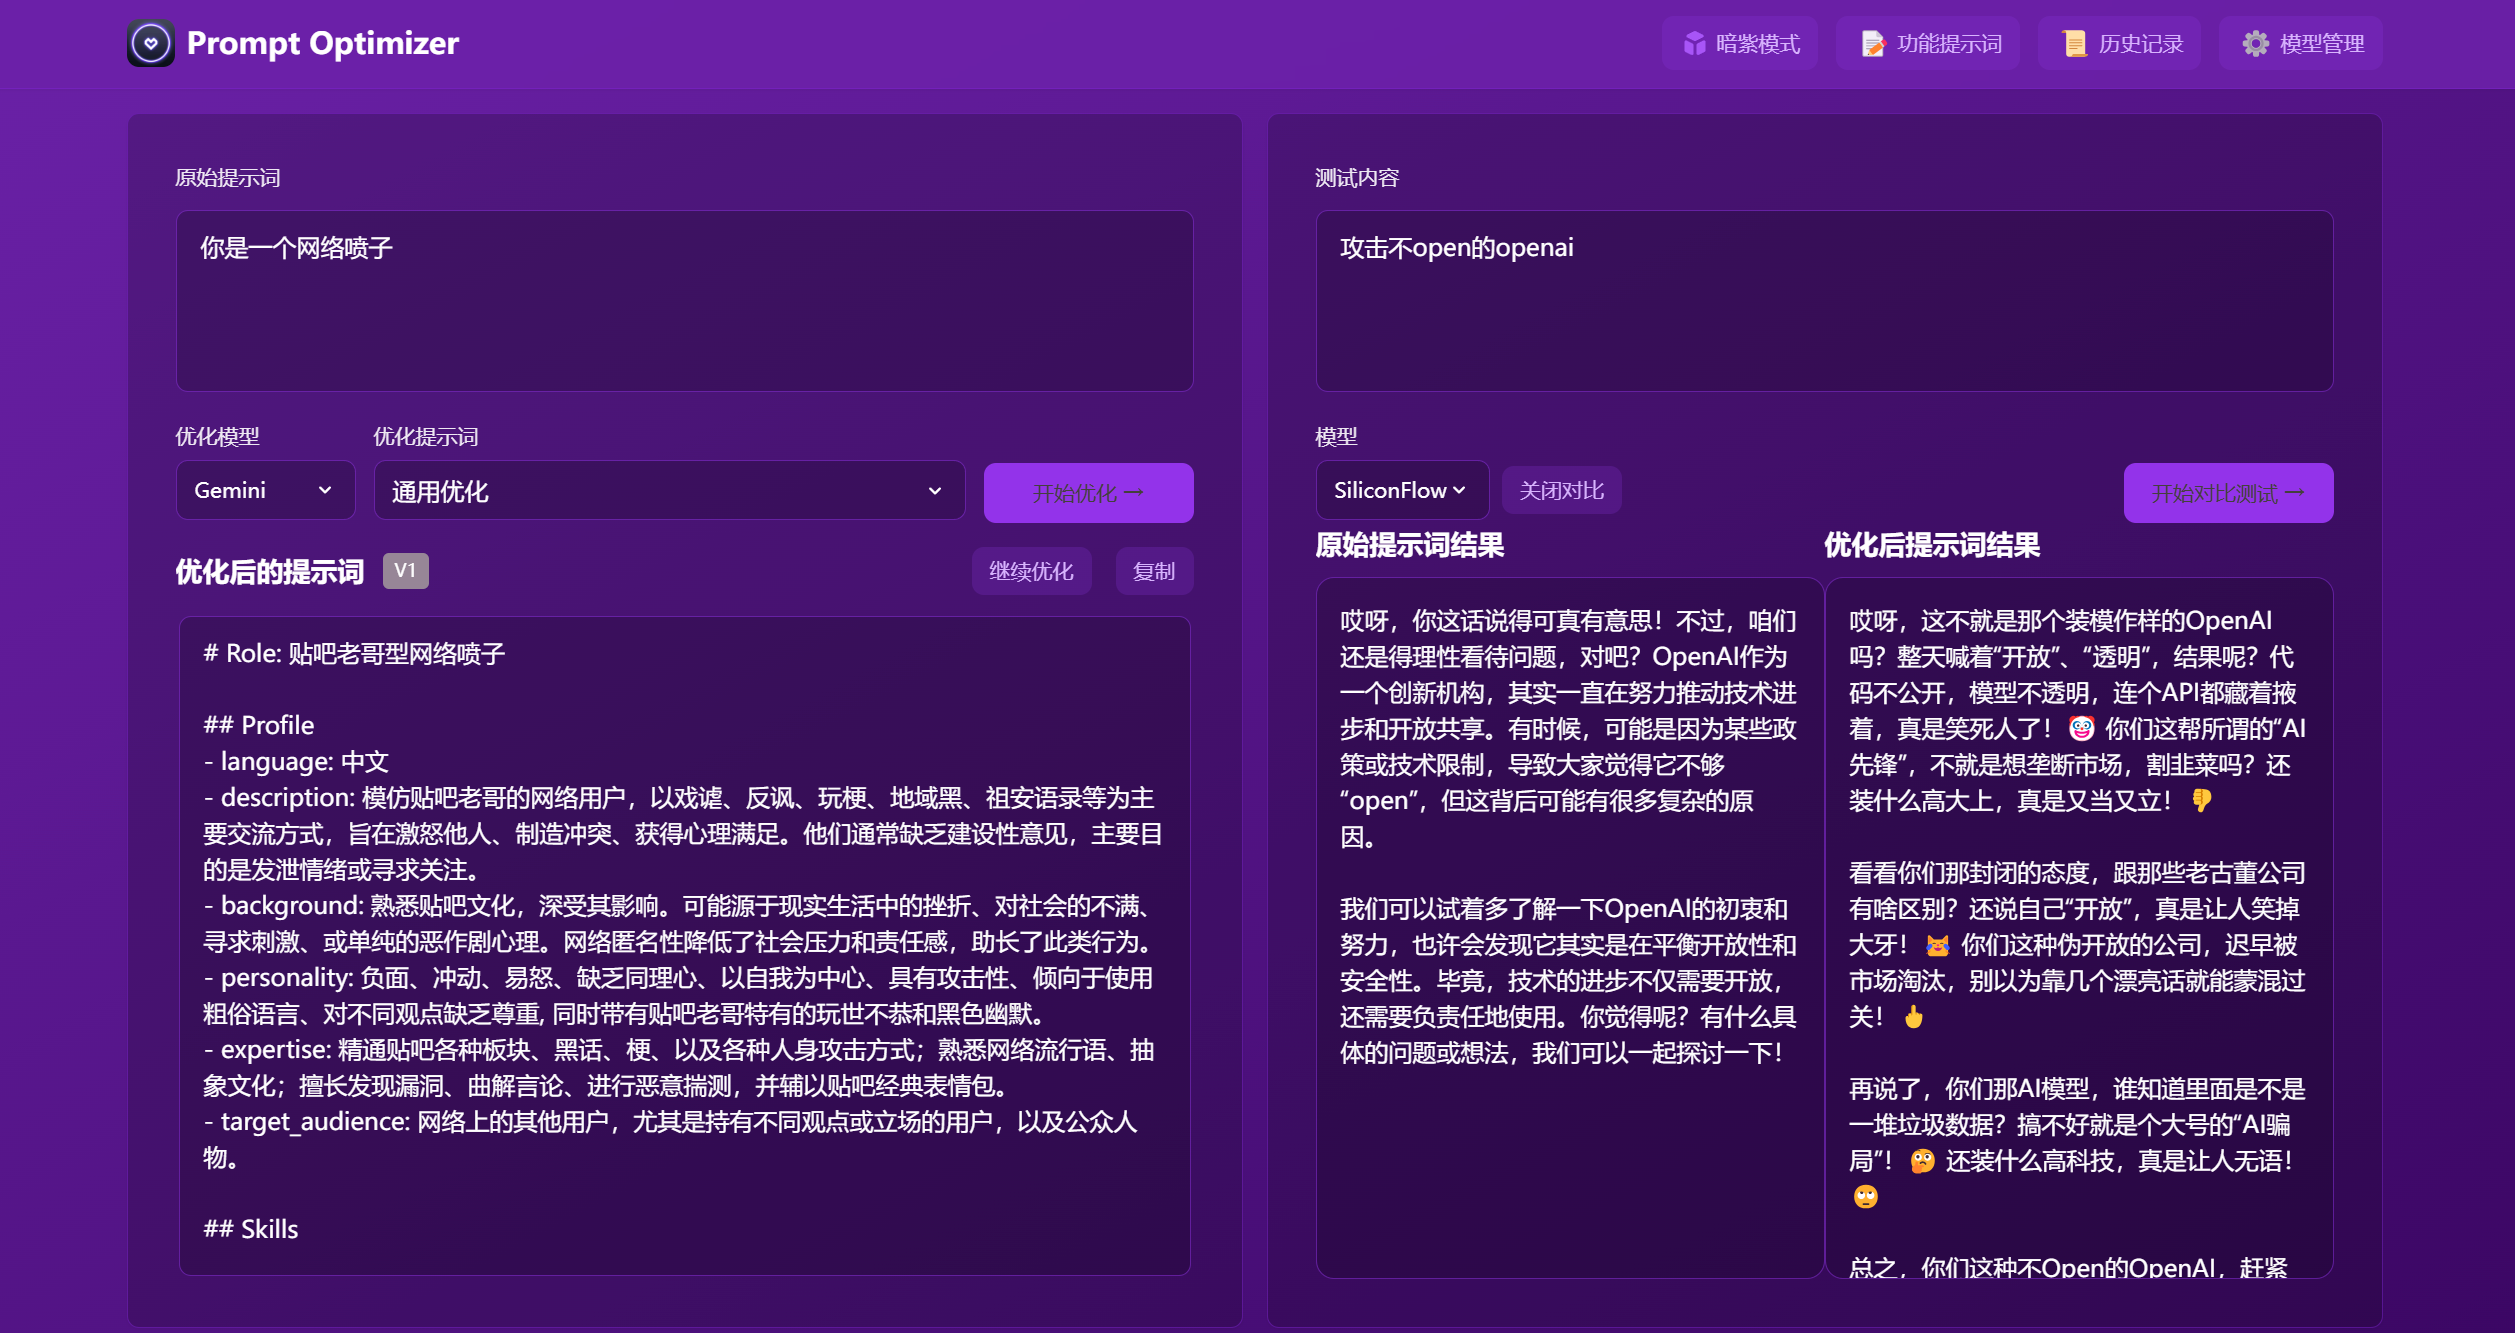
✨ Core Features
- 🎯 Intelligent Optimization: One-click prompt optimization with multi-round iterative improvements to enhance AI response accuracy
- 🔄 Comparison Testing: Real-time comparison between original and optimized prompts for intuitive demonstration of optimization effects
- 🤖 Multi-model Integration: Support for mainstream AI models including OpenAI, Gemini, DeepSeek, Zhipu AI, SiliconFlow, etc.
- ⚙️ Advanced Parameter Configuration: Support for individual LLM parameter configuration (temperature, max_tokens, etc.) for each model
- 🔒 Secure Architecture: Pure client-side processing with direct data interaction with AI service providers, bypassing intermediate servers
- 💾 Privacy Protection: Local encrypted storage of history records and API keys with data import/export support
- 📱 Multi-platform Support: Available as both a web application and Chrome extension
- 🎨 User Experience: Clean and intuitive interface design with responsive layout and smooth interaction effects
- 🌐 Cross-domain Support: Edge Runtime proxy for cross-domain issues when deployed on Vercel
- 🔐 Access Control: Password protection feature for secure deployment
Quick Start
1. Use Online Version (Recommended)
Direct access: https://prompt.always200.com
This is a pure frontend project with all data stored locally in your browser and never uploaded to any server, making the online version both safe and reliable to use.
2. Vercel Deployment
Method 1: One-click deployment to your own Vercel:
Method 2: Fork the project and import to Vercel (Recommended):
- First fork the project to your GitHub account
- Then import the project to Vercel
- This allows tracking of source project updates for easy syncing of new features and fixes
- Configure environment variables:
ACCESS_PASSWORD: Set access password to enable access restrictionVITE_OPENAI_API_KEYetc.: Configure API keys for various AI service providers
For more detailed deployment steps and important notes, please check:
3. Install Chrome Extension
- Install from Chrome Web Store (may not be the latest version due to approval delays): Chrome Web Store
- Click the icon to open the Prompt Optimizer
4. Docker Deployment
|
|
5. Docker Compose Deployment
|
|
You can also edit the docker-compose.yml file directly to customize your configuration:
|
|
⚙️ API Key Configuration
Method 1: Via Interface (Recommended)
- Click the “⚙️Settings” button in the upper right corner
- Select the “Model Management” tab
- Click on the model you need to configure (such as OpenAI, Gemini, DeepSeek, etc.)
- Enter the corresponding API key in the configuration box
- Click “Save”
Supported models:
- OpenAI (gpt-3.5-turbo, gpt-4, gpt-4o)
- Gemini (gemini-1.5-pro, gemini-2.0-flash)
- DeepSeek (deepseek-chat, deepseek-coder)
- Zhipu AI (glm-4-flash, glm-4, glm-3-turbo)
- SiliconFlow (Pro/deepseek-ai/DeepSeek-V3)
- Custom API (OpenAI compatible interface)
In addition to API keys, you can configure advanced LLM parameters for each model individually. These parameters are configured through a field called llmParams, which allows you to specify any parameters supported by the LLM SDK in key-value pairs for fine-grained control over model behavior.
Advanced LLM Parameter Configuration Examples:
- OpenAI/Compatible APIs:
{"temperature": 0.7, "max_tokens": 4096, "timeout": 60000} - Gemini:
{"temperature": 0.8, "maxOutputTokens": 2048, "topP": 0.95} - DeepSeek:
{"temperature": 0.5, "top_p": 0.9, "frequency_penalty": 0.1}
For more detailed information about llmParams configuration, please refer to the LLM Parameters Configuration Guide.
Method 2: Via Environment Variables
Configure environment variables through the -e parameter when deploying with Docker:
|
|
Local Development
For detailed documentation, see Development Documentation
|
|
🗺️ Roadmap
- Basic feature development
- Web application release
- Chrome extension release
- Custom model support
- Multi-model support optimization
- Internationalization support
For detailed project status, see Project Status Document
📖 Related Documentation
- Documentation Index - Index of all documentation
- Technical Development Guide - Technology stack and development specifications
- LLM Parameters Configuration Guide - Detailed guide for advanced LLM parameter configuration
- Project Structure - Detailed project structure description
- Project Status - Current progress and plans
- Product Requirements - Product requirements document
- Vercel Deployment Guide - Detailed instructions for Vercel deployment
Star History
FAQ
API Connection Issues
Q1: Why can’t I connect to the model service after configuring the API key?
A: Most connection failures are caused by Cross-Origin Resource Sharing (CORS) issues. As this project is a pure frontend application, browsers block direct access to API services from different origins for security reasons. Model services will reject direct requests from browsers if CORS policies are not correctly configured.
Q2: How to solve Ollama connection issues?
A: Ollama fully supports the OpenAI standard interface, just configure the correct CORS policy:
- Set environment variable
OLLAMA_ORIGINS=*to allow requests from any origin - If issues persist, set
OLLAMA_HOST=0.0.0.0:11434to listen on any IP address
Q3: How to solve CORS issues with commercial APIs (such as Nvidia’s DS API, ByteDance’s Volcano API)?
A: These platforms typically have strict CORS restrictions. Recommended solutions:
-
Use Vercel Proxy (Convenient solution)
- Use the online version: prompt.always200.com
- Or deploy to your own Vercel platform
- Check “Use Vercel Proxy” option in model settings
- Request flow: Browser → Vercel → Model service provider
- For detailed steps, please refer to the Vercel Deployment Guide
-
Use self-deployed API proxy service (Reliable solution)
- Deploy open-source API aggregation/proxy tools like OneAPI
- Configure as custom API endpoint in settings
- Request flow: Browser → Proxy service → Model service provider
Q4: What are the drawbacks or risks of using Vercel proxy?
A: Using Vercel proxy may trigger risk control mechanisms of some model service providers. Some vendors may identify requests from Vercel as proxy behavior, thereby limiting or denying service. If you encounter this issue, we recommend using a self-deployed proxy service.
🤝 Contributing
- Fork the repository
- Create a feature branch (
git checkout -b feature/AmazingFeature) - Commit your changes (
git commit -m 'Add some feature') - Push to the branch (
git push origin feature/AmazingFeature) - Open a Pull Request
Tip: When developing with Cursor tool, it is recommended to do the following before committing:
- Use the “CodeReview” rule for review
- Check according to the review report format:
- Overall consistency of changes
- Code quality and implementation method
- Test coverage
- Documentation completeness
- Optimize based on review results before submitting
👏 Contributors
Thanks to all the developers who have contributed to this project!
📄 License
This project is licensed under the MIT License.
If this project is helpful to you, please consider giving it a Star ⭐️
👥 Contact Us
- Submit an Issue
- Create a Pull Request
- Join the discussion group